How to Type on the Keyboard - Part 1
The rules of touch typing are very simple and can be learned quickly. These articles will teach you the basics of touch typing to help you get started. Building speed and accuracy requires time and practice, however. Create a free account and our site will provide the training you need.
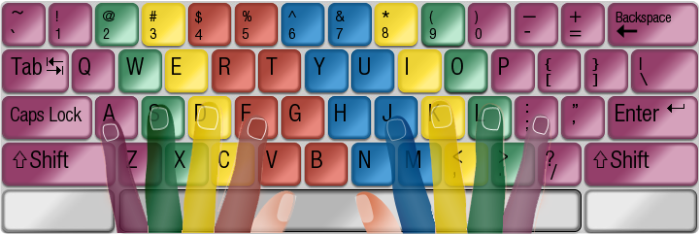
To start, place your fingers on the keyboard according to the diagram shown here. The fingers of your left hand rest on the A, S, D, and F keys, while the fingers of your right hand rest on the J, K, L, and ; keys.

In the diagram, the color coding shows which fingers are used to reach each key. For instance, the left index finger is used to reach all red keys. You can also try our interactive demonstration.
The middle row of the keyboard is known as the "home row". It's called this because, as you type, your fingers will always return to it after a key is pressed.
The space bar may be pressed with your left or right thumb - whichever is more comfortable for you.
When using the Shift key to type a capital letter or punctuation symbol, always use the Shift key on the opposite side of the keyboard. For instance, to type a capital P, use your right hand to type the P and use your left hand to press the left Shift key.
Basic Tutorials
Try our interactive demonstration to see exactly how to reach each key.